- March 14, 2022
- In Dynamics 365, Dynamics 365 Sales, Dynamics 365 Web Api
- One Response
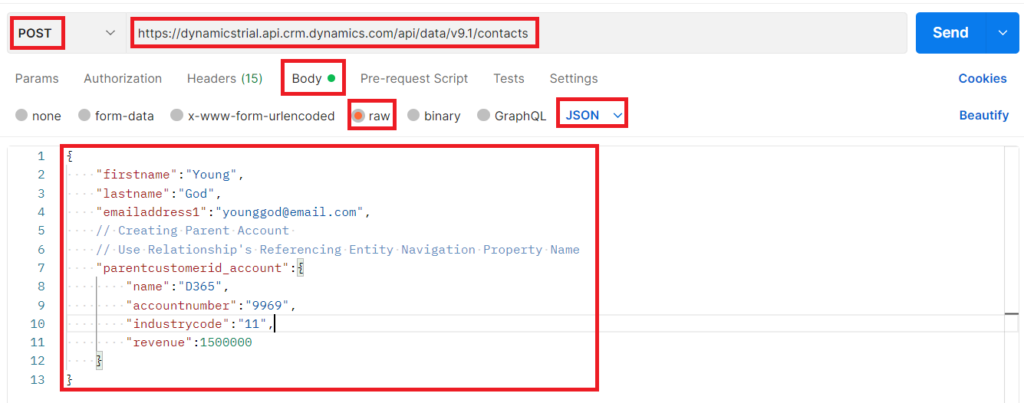
POST request is used to create a record, So we’ll use POST request to create Parent – Child record. Select the POST request, Set the Dynamics API URL and entity set name in the header.
To create Parent Account Record, Use Relationship’s Referencing Entity Navigation Property Name.
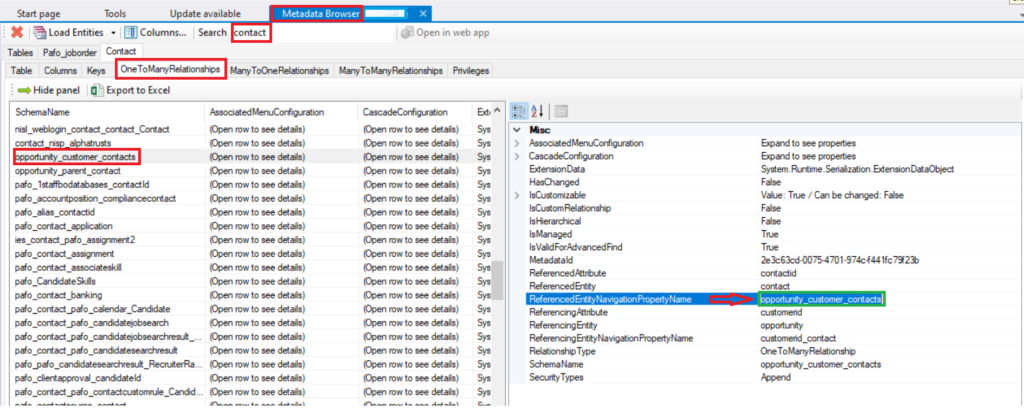
How to get Relationship’s Referencing Entity Navigation Property Name :


Request Body Data:
{
    "firstname":"Young",

    "lastname":"God",

    "emailaddress1":"younggod@email.com",

    // Creating Parent Account

    // Use Relationship's Referencing Entity Navigation Property Name

    "parentcustomerid_account":{

        "name":"D365",

        "accountnumber":"9969",

        "industrycode":"11",

       "revenue":1500000

    }

}
Now navigate to Headers tab and click on Bulk Edit and add below Key-Value (Details of the headers can be referenced from the reference link at the end of blog):
OData-MaxVersion:4.0
OData-Version:4.0
Accept:application/json
Content-Type:application/json; charset=utf-8
Prefer:odata.include-annotations=”*”,return=representation

Now click on Send Request and Select the JSON object in the response because we have selected JSON type object in the request body.

This POST request will create record in Contact Entity with status “201 Created” in the response body.
To create Child Opportunity Record, Use Relationship’s Referenced Entity Navigation Property Name.
How to get Relationship’s Referenced Entity Navigation Property Name :


Request Body Data:
{
    "firstname":"Young",

    "lastname":"God",

    "emailaddress1":"younggod@email.com",

    // Creating Child Account

    // Use Relationship's Referenced Entity Navigation Property Name

    "opportunity_customer_contacts":[

    {

        "name":"D365 Opportunity",

        "budgetamount":50000.000,

        "estimatedvalue":40000.000,

        "estimatedclosedate":"2022-12-15"

    },

    {

        "name":"D365 License Renewal",

        "budgetamount":1200.000,

        "estimatedvalue":500.000,

        "estimatedclosedate":"2023-12-31"

    }

    ]

}


This POST request will create record for Contact with Child Opportunity Record and status as “201 Created” in the response body. The mechanism of authentication and authorization for D365 Web API is explained in detail in the below links.
Happy D365ing.
Reference Links:
Tutorial: Register an app with Azure Active Directory (Microsoft Dataverse for Apps) – Power Apps
Create Application User In Dynamics CRM
Compose HTTP requests and handle errors (Microsoft Dataverse for Apps) – Power Apps
Let started with our D365 Quickstart package and get onboard within 7 days!
I'M INTERESTED!
Thank you for posting. I am trying to create a contact and case using the same approach and it is throwing error “You should specify a contact or account.”
Following is my json :
{
“casetypecode”:2,
“title”:“Test Case Web aPI”,
“customerid_contact” :{
“firstname”: “Test Contact with Case with Note”,
“lastname”: “Web APi Call”,
“emailaddress1”: “abc@abc.com”,
“telephone1”: “231497979”
}
}